New Visitor? Like what you read? Then please subscribe to my Blog Feed or sign up for Free Email Updates. Thanks for Visiting!
Here are some tips and tricks for Cascading Style Sheet (CSS) in your blog....... In old Blogger the css section is enclosed between tags. In new Blogger the css follows the same rules except that it is enclosed between and tags. For more details on how the template is structured see Parts of the Template. These are called as embedded style sheets since they are embedded within the document itself. However you can import other style sheets using this coding :
Blogger Hacks Part 1: Creating a static homepage | Wednesday, 9 February 2011
Introduction
After searching around for somewhere to host my site I finally settled with Blogger. Why? Because I decided I preferred the choice of templates and in particular the drag-drop gadgets and page elements.
What I didn't like is that it is purely a blogging site. This is quite restrictive in terms of content as I really wanted the ability to create more of a website than a blog.
Well after a bit of trial and error, it turns out the new Blogger templates are fairly easy to 'hack', and as such I've managed to get the best of both worlds. I have the cool WYSIWYG gadgets and templates of Blogger, but have also fashioned a static home page and navigation structure.
Update
This article has been updated to reflect the simplified technique that I'm currently using for this website. There are also several alternative techniques which involve editing the Blogger template directly, or by making use of the new static pages. I've briefly described these solutions below for reference.
Simplified Technique
This technique is simply a Blogger setting which allows a user to limit the number of blogs displayed on the default page. By changing this setting to 1, a static homepage is created which will always display the most recent post. By manually configuring the publish dates of the blogs you can then control which content will will displayed on the homepage.
To set the post limit login to the Blogger console and navigate to Settings -> Formatting. Change the "show at most" setting to "1 post".
Next override the publish date of the post you wish to display on the homepage. This can be found in the Post Options menu at the bottom of the blog editor.
Template Redirect Hack
An alternative technique I've previously written about involves editing the Blogger template, and adding code to redirect to a URL of choice. This has the advantage that you don't have to manually edit the post dates every time you create a new post, but does break the Blogger designer view and is not SEO friendly.
To implement the redirect on the homepage login to the console and navigate to the template editor Design -> Edit HTML.
Backup your existing template before making changes.
Using the editor scroll down to the tag, and insert the following code directly beneath this line. Replace http://mysite.com/post.html with the URL you wish to use as your homepage (this should be the URL of a specific post, or you could use a static page now supported by Blogger).
The code above causes a client-side redirect as soon as the page loads. If you really want to go all-out and improve the implementation further, you can also include the following edits. This will reduce the time taken for the initial page-load prior to the redirect and further improve the user experience. It also provides a manual link for users with JavaScript disabled. I'd recommend only making these changes if you are comfortable editing HTML.
Using the editor scroll down and locate the tag in the template. You now need to wrap the entire contents of the tag with the following code. This is everything inside the tag and the tag.
Remember that with this technique in place you will not be able to use the Blogger designer to manage your gadgets. To do this you will need to temporarily disable the hack.
Summary
That's all there is to it. In the next article I'll explain how to set up a navigation structure within Blogger.
OK, everybody knows that, with a Blogger blog, you can't really make a static home page. That's one of the known limitations of Blogger blogs. The home page of a Blogger blog will contain the most recent posts - as specified by the Settings - Formatting "Show at most" value.
So, just don't show any posts on the main page. That's not a lot of work, really.
In Settings - Formatting, set "Show at most" to 0 posts.
Add a "Welcome" gadget, using an HTML / Text gadget. Or compose a "Welcome" gadget using Post Editor, if you want a really shiny static home page. You'll have a couple choices for positioning the new gadget.
If you want your Welcome gadget to look like a "Welcome" post, you can position it just above the Blog Posts gadget, and have the sidebar(s) visible.
If you want your Welcome gadget to look like a "welcome" header message,, you can position it just below the blog header, and have the sidebar(s) below it and not visible.
Remove the Status Message code from the template, so your readers don't have to look at the "No posts were found which match your query" / "Showing posts with label" message (both messages are produced by the same code).
If you wish, look at my Static WebSite Test blog, and see how simple it is. Note that my example shows a linklist in the sidebar, with mostly links to other blogs. It's a separate task (no more complicated than this one) to create a menu bar for this blog, to index pages and posts in this blog.
As we said a few weeks ago when we launched a completely rebuilt, streamlined authoring and editing experience, we’re in the process of bringing you a much improved and modernized Blogger. The next phase of these updates starts today with seven new ways to display your blog, called Dynamic Views.
Built with the latest in web technology (AJAX, HTML5 and CSS3), Dynamic Views is a unique browsing experience that will inspire your readers to explore your blog in new ways. The interactive layouts make it easier for readers to enjoy and discover your posts, loading 40 percent faster than traditional templates and bringing older entries to the surface so they seem fresh again.
Dynamic Views is much more than just new templates. With just a couple clicks, you’ll get infinite scrolling (say goodbye to the “Older posts” link), images that load as you browse, integrated search, sorting by date, label and author, lightbox-style posts for easy viewing, keyboard shortcuts for quickly flipping through posts, and one-click sharing to Google+ and other social sites on every post.
No two blogs are the same, so you can choose from seven different views that display text and photos differently. For example, if you have lots of photos on your blog, you may prefer Flipcard or Snapshot. If your blog is more text-heavy, then Classic, Sidebar (what you’re seeing now on Blogger Buzz) or Timeslide may be preferable. Here’s a quick description of each of the new views, along with links to some of our favorite blogs where you can check each of them out in action.
Classic (Gmail): A modern twist on a traditional template, with infinite scrolling and images that load as you go
Flipcard (M loves M) - Your photos are tiled across the page and flip to reveal the post title
Magazine (Advanced Style) - A clean, elegant editorial style layout
Mosaic (Crosby’s Kitchen) - A mosaic mix of different sized images and text
Sidebar (Blogger Buzz Blog) - An email inbox-like view with a reading page for quick scrolling and browsing
Enter the name of your favorite Blogger blog below and click Preview to check it out with Dynamic Views. .blogspot.com
Adding a Dynamic View to your blog is as easy as changing your template. Log in to Blogger, click on the Template tab on your dashboard, and select whichever view you want to set as your default. Note that readers can still choose to navigate your blog in a different view by selecting from the pulldown in the upper left of the screen.
If you want to add your own touch to any of these new views, you can upload a header image and customize the background colors. We’ll be adding more ways to customize Dynamic Views in the coming weeks.
We hope you enjoy the latest update to Blogger, and that, as always, you tell us what you think by completing this short survey.
Note: In addition to Blogger Buzz, several other official Google blogs will be featuring Dynamic Views through the weeks and months ahead, including the Gmail Blog, LatLong Blog and Docs Blog. We’re excited to bring Dynamic Views into the fold and we'll be looking at how to incorporate this new technology across Google’s blog network in the long term.
Update 7:31pm: We've added back a working link to submit your feedback. Update 6:00pm: Earlier today, this post included a link to a feedback form. We do value your feedback and want to know what you think of this update; we'll have a feedback link up again soon.
Amazing Concept iPhone 5. This CG iPhone 5 has advanced iPhone features such as a sleeker iPhone design, a laser keyboard & holographic display all rolled into this iPhone 5 video.
The computer generated Concept iPhone 5 features is an exponential leap to the iPhone 4 or iPhone 3gs of today.
We hope you enjoy this iPhone 5 video more than the current trend of iPhone 5 rumors such as iPhone 5 leaked and iPhone 5 unboxing videos. Apple is yet to make the iPhone 5 announcement. So have your fill of this new iPhone video before the iPhone 5 release.
Soundtrack "Movement Proposition" Kevin MacLeod (incompetech.com) Licensed under Creative Commons "Attribution 3.0" http://creativecommons.org/licenses/by/3.0/
Do me a favour? Are you using Safari as your main browser? Go check out Activity Monitor, sort the columns by “Real Memory” with the largest at the top, and tell me what you see. Go ahead. I’ll wait.
Do you see something called Safari Web Content? That’s part of the new Safari 5.1. It’s a part of the “sand-boxing” that Safari does, keeping pages loaded in their own compartmentalized areas, so that if a process on one page crashes, it doesn’t take down everything with it.
Well, now that it’s a separate process from Safari, it’s easier to see just how much memory Safari Web Content is taking up. In fact, it takes up quite a bit, with some users reporting that with many tabs open the memory usage can get over 1.0GB or more. If you’re experiencing this, you’ll probably notice Safari getting slow as the memory creeps up. So, what to do?
Well, the first thing that some are suggesting is to disable any Safari extensions that you may have running, and see if that helps matters. Theoretically there could be some incompatibility issues with extensions and Safari 5.1 that might lead to increased memory usage. If you turn them off, and re-enable them one by one, you might be able to ferret out which extension is causing the problem. TUAW’s Chris Rawson found his Safari Web Content memory usage drop from 1.06GB down to around 300MB when he disabled most of his extensions.
As others are reporting, this issue exists on OS X 10.6 Snow Leopard as well. So it seems that this is a Safari problem, and not an OS X Lion problem. But it’s interesting that we tend to notice things when we make a big change. In our “latest new thing” mode, we tend to check out all the new features, and we check under the hood. We are more likely to notice when something is new. It’s just how we are.
Just for kicks, I tried loading the same 4 tabs in Chrome that I had loaded in Safari. Total memory usage? 82.4 MB. And I also discovered that I hadn’t updated Firefox from version 4 yet. So you see? You notice things when you upgrade your OS!
Automator returns in Leopard, even more powerful and easier-to-use. It's streamlined interface and new abilities, define the next generation of automation in Mac OS X.
Automator is simple.
Anyone can use Automator. Creating automated workflows is a simple drag-and-drop process of visually selecting and connecting the individual actions you want the computer to do for you-there's absolutely no code to write. Click the Run button and Automator goes to work. And you can be a hero to your friends by sharing your favorite Automator workflows with them!
With Automator you can automate just about everything you do with your computer. Create and print a family directory with the contacts in your Address Book. Find and add images from your favorite websites to iPhoto. Print your Keynote business presentations to your iPod Photo. Perform scheduled backups of important files. There's no limit to what you can do. Add more actions and you can do even more.
Automator is powerful.
Automator can do in seconds and minutes what would take you hours to do by hand. Automator gives you direct access and control of the powerful Mac OS X frameworks like Core Image, Core Data, Core Audio and Core Video, to process hundreds of images, or folders and folders of files.
In addition, Automator moves information seamlessly between the Mac OS X applications you use every day to organize your life, like Finder, Mail, Address Book, and iCal. Even the iLife applications iPhoto, iTunes, and iDVD, can be included in your workflows. When you have to tackle complex or repetitive tasks, Automator is the right tool for the job.
Quicksilver is a computer utility software program for Mac OS X, originally developed by Blacktree Software and distributed freely. It is essentially a graphical shell for the Mac OS X operating system, allowing users to use the keyboard to rapidly perform tasks such as launching applications, manipulating files, or sending e-mail. It is similar to the Mac OS X applications LaunchBar and Alfred, but uses a different interaction paradigm. Although a complex application, Quicksilver is based on a simple three-panel interface.
Quicksilver is designed to run all the time in the background while the operating system is running. It maintains a configurable "catalog" of items including files and folders on disk, address book contacts, Internet bookmarks, scripts, clipboard contents, etc. Pressing a configurable hotkey or a combination of keys, usually Control-Space, invokes the Quicksilver command window, which contains three panes.
The panes roughly correspond to the object, predicate, and attributes of the desired task. The user first chooses the object of the command (an application, a file, an e-mail address, an IM contact, a bookmark, etc.), then an action (predicate) to be performed on that object, and finally additional details (attributes) for the action.
The Quicksilver user interface provides access to a wide range of objects by applying incremental search to input typed on the keyboard. Most objects require typing only a few letters into any of the panes, reducing the set of suggestions and displaying the most likely match. Quicksilver uses a priority system based on previous usage (see mnemonic) to determine the most likely match, apparently "learning" from the user's actions.
Once an object is selected in the first panel, pressing the tab key moves the focus to the second pane to search for available actions for that object (the "predicate"). Each type of object has certain actions which can be performed with it. For example, files on the hard drive can be moved to the trash, revealed in the Finder, or opened in the default application for that file type.
Some actions require an "attribute" that provides further details or the specifics of an action. In this case, the third panel is used to find such an object on which to perform the command. For instance, the "Move to folder…" command requires the selection of a folder in the third panel. Quicksilver also accepts a direct-text entry mode in its panels (by pressing the "." key on a QWERTY keyboard or "=" on an AZERTY keyboard), making possible quick shell commands (Terminal) and instant messaging software (such as iChat and Adium).
Quicksilver's icon is based on the alchemical symbol for mercury (quicksilver being an archaic name for the element mercury).
Quicksilver allows users to define "triggers," which perform a specific command (direct object + action + indirect object) whenever a predefined keyboard shortcut is pressed. For instance, the <"Documents", "Reveal"> command could be bound to the F7 key. Then pressing the F7 key would open the Documents folder in the Finder and bring it to the front.
In addition to keyboard triggers, the "Mouse Triggers" plugin allows commands to be bound to simple mouse actions such as clicks or mouseovers in different parts of the screen. A plugin called "Abracadabra" supports triggers activated through more complicated mouse gestures.
Quicksilver has a plug-in architecture, with each plug-in providing integration with a program, interface, or new feature. For example, plug-ins exist for sending email via Mail without opening the application or manipulating images via text commands.
Because shell scripts and AppleScripts can be stored in the catalog, any function which can be performed using a script can be tied to Quicksilver, either through the command window, or through triggers. Because most Apple-native applications have extensive scripting libraries, many common tasks can easily be performed from Quicksilver. For instance, iTunes can be told to play or pause, increase or decrease the rating on the current track, or skip to the previous or next track.
There are various visual interfaces for the Quicksilver, alternative Constellation Menus and also a Notification Hub, which supports Growl via a plugin.
On November 6, 2007, the source code for Quicksilver was made available via Google Code.[2]
Quicksilver is now developed by a team of volunteers with work on the open source project increasing throughout 2010.[3]
In November 2009, development shifted to using GitHub.[4]
At the end of 2010, a new website QSApp.com was launched, with the aim of unifying and collating all of Quicksilver's fragmented builds, plugins and support groups. Since its launch, the site has included a new Plugins Repository, Wiki and Downloads section. After several months of development, Quicksilver version β59 was released; a marked point in the history of the application.
Experimental trunk builds of Quicksilver, known as Alchemy, have many major changes.
Triggers are moving to a separate product, called Catalyst
All the little frameworks are being joined into one big one called Crucible. This includes extensions and core functionality that most apps and plugins will use. This is currently called QSBase.framework
The preferences will be greatly simplified. There will be Extras-style advanced preferences for the fiddly options.
Plugins are going to be hidden from most users, they'll activate themselves automatically or be installable from the web
β5X Plugins are incompatible.
These builds have four major components: Crucible, a framework with extension to AppKit and tools common to all Alchemy apps; elements, a framework supporting the plugin architecture; quicksilver, a command window driven launcher; and catalyst, which triggers a preference pane.
A repository of plug-ins and tools that extend the functionality Apple Mail. Notifcation list
This resource will shortly be updated with a slew of changes - stay tuned! Meanwhile ... if you would like to be notified of changes, subscribe to our low-volume, high signal:noise notification list! NEW! Mac OSX 10.7 Lion compatibility.
Now Lion has been released, we can inform you that Apple Mail Lion will automatically disable ALL plugins, whether Lion-compatible or not. This is not expected behaviour, as Apple Mail can distinguish between Lion-compatible/incompatible plugins. It is not currently known whether this will be addressed by future updates, but in the meantime, either check here for Lion-compatible plugin information, or check directly with the developer.
DEVELOPERS.
If you have a plugin that you would like listed here, or have compatibility or other information to provide, please email plugins (at) this domain. Thanks!
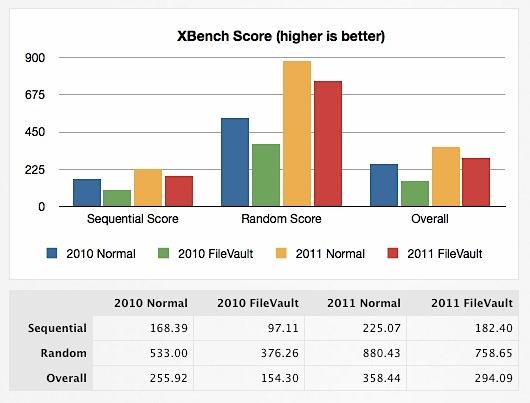
FileVault 2 is the all new disk encryption method that comes with Lion, and it’s more secure than ever, using XTS-AES 128 encryption on your entire disk, as opposed to just the user directory as in past versions. The other huge change that came with FileVault 2 is the significant performance boost, where using full disk encryption barely makes a dent on system performance.
Bottom line: if you have a Core i3, Core i5, or Core i7 processor, you’ll barely notice the impact of disk encryption, regardless of whether you’re using an SSD or traditional platter drive. Is a tiny performance hit worth the peace of mind of total data security? You’ll have to decide, but if you have sensitive data and a newer CPU on your Mac, it probably is.
If you want to enable FileVault 2 yourself, you can do so in the “Security & Privacy” panel of System Preferences. You can even store the key with Apple which can be retrieved by answering some standard security questions, making it virtually impossible to accidentally lose access to your own data if you forget a password or lose the encryption key.
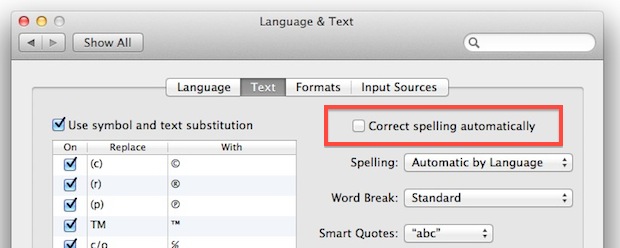
Annoyed with OS X Lion‘s new auto correct feature? You can turn disable it quickly:
Launch System Preferences, click on “Language & Text”
Click on the “Text” tab and uncheck the box next to “correct spelling automatically”
Auto correct in Lion is seemingly a lot more intelligent than past iOS versions, but it still can be frustrating when you are typing unique names of people, products, companies, slang, and even various tech terms.
Obviously if you want it enabled again, you just need to recheck that box.
Easily and quickly send files and folders to multiple destinations across your LAN by simply dragging files onto recipients in a popup window.
The easiest way to get things from one place to another quickly without dialogs, passwords or confirmations. DropCopy is FREE for personal use (up to 3 machines on a network) and $25 for larger networks but donations are always welcome.
Macworld says: “It’s become one of the first things I install on any new Mac” - read the full review here.
DropCopy is designed to function as intuitively as possible: simply launch it on 2 or more computers (or iOS devices) and wait for the dropzone to appear. Then drag a file to the dropzone and drop it on your chosen destination. Watch the short video below to see DropCopy in action:
Open a Web browser and log in to your Blogger account. This opens the Blogger "Dashboard" page.
Find the blog that you want to edit from the list of blogs on the "Dashboard."
Click the "Design" link under the blog heading. This opens the design-settings page for the blog.
Click the "Edit HTML" link from the top menu. Find the "Backup/Restore Template" heading at the top of the page.
Click the "Choose File" button beside "Upload a Template From a File on Your Hard Drive." Browse through your computer to find the Blogger template file. This ends with a ".xml" file extension. Click the file to select it.
Click the "Upload" button to upload the blog template to Blogger. This replaces your existing template with the new template.
Click the "Save Template" button at the bottom of the page.
I’m a big fan of Edovia’s Screen VNC client for the iPhone and iPad. Whilst I still use LogMeIn when I need to access my computer’s filesystem remotely and I enjoy the service’s social features and network-recognition capabilities (when combined with Hamachi), my basic VNC needs can be easily satisfied with Screens, which provides a very intuitive interface to set up new computers, connect to them, and use them. I don’t recall a single time I haven’t used Screens at least once a day in the past few months to quickly connect to my iMac while I’m on the couch, and fire up some Spotify through the room. For quick connections, Screens is a great app — it even works on 3G and remote Wi-Fi networks thanks to a companion desktop app that will make your Mac available outside your local network.
In my overview of the improved Screen Sharing app in OS X Lion, I detailed how Apple enhanced the system utility with new clipboard features, per-user login, and possibility of grabbing a screenshot of the connected machine. With Screens for Mac, released last week, Edovia offers an alternative to Apple’s default Screen Sharing app that doesn’t have new breakthrough functionalities, but dramatically improves the organization of your remote desktops, and gives you more control over what you’re connecting to.
Last weekend I decided that I wanted to try to set up a VPN server on my MacBook Pro running Snow Leopard 10.6.6. What’s that? — you may ask. A Virtual Private Network (VPN) is a type of Internet connection that allows users to establish a secure connection between a computer or a mobile device and a server. The cool thing about the secure connection is that all traffic is “tunneled” through a cryptographic system that makes it almost impossible (let’s say very difficult) for hackers or people who want to take a peek at your Internet traffic to access your data. There are several implementations of VPN out there, but the main concept is that through a secure connection multiple computers and devices can stay on the same local “virtual network”.
SiteSucker is a Macintosh application that automatically downloads Web sites from the Internet. It does this by asynchronously copying the site's Web pages, images, backgrounds, movies, and other files to your local hard drive. Just enter a URL (Uniform Resource Locator), press return, and SiteSucker can download an entire Web site.
SiteSucker can be used to make local copies of Web sites. It can download files unmodified or "localize" the files it downloads, allowing you to browse a site offline.

 CSS Tips and Tricks for Blogger.