23.6.13

Picasa Web Albums Are Almost Dead, Now Redirecting Photo Owners To Google+, Too | TechCrunch

Picasa Web Albums Are Almost Dead, Now Redirecting Photo Owners To Google+, Too | TechCrunch

Sarah Perez

Tuesday, March 5th, 2013

Image (1) picasalogo210.gif for post 21654
We’ve known for some time that Google would be transitioning users away from its Picasa photo-sharing service to Google+ Photos, but now that process is nearly complete. Google has begun to redirect users from the old Picasa URL (picasweb.google.com) to Google+ Photos, which currently still offers a way to return to the old Picasa Web Albums interface during this transitional period.
The Google Operating System blog (an unofficial Google watching blog) noticed this redirect today, as well, noting that you can use the URL  https://picasaweb.google.com/lh/myphotos?noredirect=1 to go directly to Picasa Web Albums without experiencing the redirect first and having to click back.
As not everyone will be ready to make the move just yet, the service will remember your preferences before the final switch is completed. So for example, if you head to Picasa Web Albums and are redirected, but choose to click the link back to Picasa, Google will set a session cookie to remember your choice and take you directly to Picasa the next time.
picasa-web-google-plus-redirect
A redirect has been in place for photo viewers for quite some time, although you might not have heard about it since there has been no official announcement. That means if you were a Google+ user who clicked a link to a Picasa Web Album, you were already redirected to Google+ in the past.
What’s new is that redirect for photo owners, however. That means if you’re a Google+ user who is visiting the Picasa Web Album URL, you’re now being redirected to Google+ Photos. This has been live for about a week. It’s another step forward on the slow and careful transition process that Google is taking with what will be Picasa’s eventual shuttering.
The good news is that if you’re ready to make the switch, you won’t have to move your photos – they’ll all be transitioned for you to Google+. Since last year, Google has been synchronizing the uploading and storage activity for new photos between the two services, it should be noted. And it has now also transitioned over your old photos from Picasa Web Albums to Google+ Photos, as well. That’s a big step forward towards finally shutting down Picasa for good, which is clearly the direction Google is headed.
The company ended support for its Picasa Web Albums Uploader for Mac and its iPhoto plugin in spring 2012, and Linux support has ended as well. Desktop software programs still work if you already have them installed, however, and the Picasa homepage still points you to software downloads.
Google+ Photos Chrome App Nears Debut
Google is working on a full transition of Picasa’s service to Google+, which also includes a new photo organizer Chrome app called the Google+ Photos App. During its recent Chromebook Pixel news conference, the company announced the app would arrive “in the coming weeks.”
In late February, developer Francois Beaufort, who digs around in Google code for unreleased apps and upcoming features, figured out how to access the Google+ Photos app in advance of its debut. The images he posted show the automatic import process, first launch screens, and the app’s main screen, among other things. (Some photos he posted came from Saša Stefanović).


screenshots:
http://techcrunch.com/2013/03/05/picasa-web-albums-are-officially-dead-now-redirect-to-google-photos/screenshot-2013-02-27-at-11-18-41/
11.6.13

Use your HDTV as a second display using Apple TV and AirPlay (OS X Mavericks)

OS X Mavericks lets you use your HDTV as a second display using Apple TV and AirPlay

by tomek on June 10, 2013
os x mavericks apple tv OS X Mavericks lets you use your HDTV as a second display using Apple TV and AirPlay

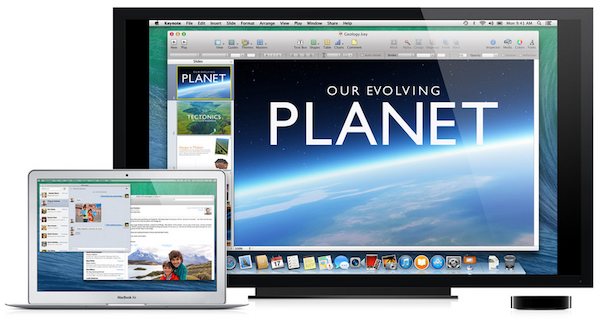
Apple has just unveiled a new operating system for MacOS X Mavericks at WWDC 2013. Among the new power user features introduced in Mavericks is multi-display support enhancement: the menu bar and dock are now available on any display, and users can run windowed or full-screen apps on whichever display they choose, with no configuration required. With Mavericks you can also use your HDTV as a second display using Apple TV and AirPlay.

With AirPlay and Apple TV, your HDTV works as a fully functional display. So while you’re using your TV to present a slideshow or stream a video lecture, you can take notes on your Mac or chat using Messages.
While native multi-display support in Mavericks is a great feature, the apps like AirParrot have offered this feature for almost a year and a half.

OS X Mavericks is available to Mac Developer Program members starting today. Mac users will be able to download Mavericks from the Mac App Store this fall.

7.6.13

Bluetooth keyboard with your Apple TV (5.2/iOS 6.1)

How to add and use a Bluetooth keyboard with your Apple TV (5.2/iOS 6.1)

by umOuch on February 20, 2013

apple tv bluetooth keyboard How to add and use a Bluetooth keyboard with your Apple TV (5.2/iOS 6.1)

It was not long ago that we shared the news regarding Apple officially activating its Bluetooth hardware, via the 5.2 update, on their Apple TV 2 and Apple TV 3 devices. Though it seems that support is limited to Bluetooth keyboards, not Bluetooth remotes, only time will tell if Apple has a line of new peripherals on the way for us all. As exciting as the news is, having Bluetooth capabilities does no good if users are unsure/unable to utilize these features.


We also want to remind those of you that own an Apple TV 1, the silver box, that this guide will not pertain to your device as you have no Bluetooth hardware enabled by default. If you own an Apple TV 1, and would like Bluetooth support, you will need to look into other LINUX-based options (see our guide on installing openELEC) paired with Bluetooth dongles.

REQUIREMENTS
1. Bluetooth keyboard
2. Apple TV remote (hardware or software)
3. Apple TV (2nd or 3rd generation) updated to the latest 5.2 firmware
4. A desire for your media center to have additional awesomeness

LIMITATIONS (according to Apple)
1. Bluetooth support on Apple TV is for keyboards only. Headsets, speakers, and other devices are not supported.
2. If you are having difficultly connecting or using a third-party Bluetooth keyboard, contact the manufacturer to verify that it is compatible with Apple products and Apple TV.
3. The original Apple Wireless Keyboard (2003), that features a white case and uses four AA batteries, is not compatible.

apple tv contest1 How to add and use a Bluetooth keyboard with your Apple TV (5.2/iOS 6.1)

PAIRING

The first thing we need to do, as is the case when using any Bluetooth devices, is “pair” our hardware. Pairing is simply the process of connecting the two devices to each other, therein allowing them to communicate with each other.

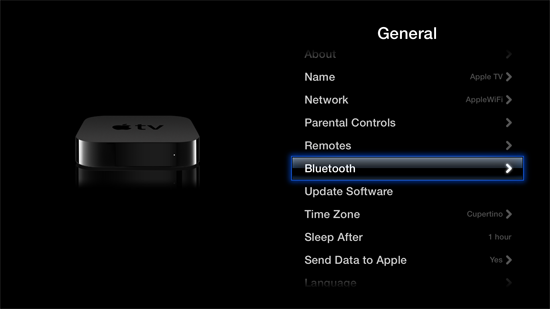
1) From your main menu, navigate to the Settings -> General -> Bluetooth

bluetooth atv 01 How to add and use a Bluetooth keyboard with your Apple TV (5.2/iOS 6.1)

3) At this point, let’s go ahead and turn on the keyboard and set it in “pairing mode”

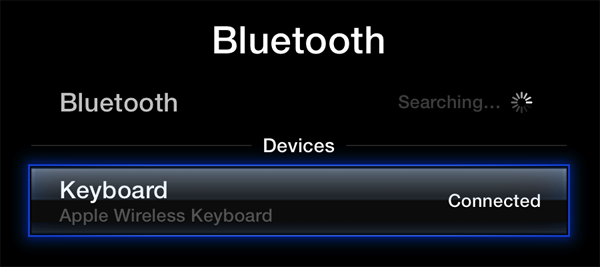
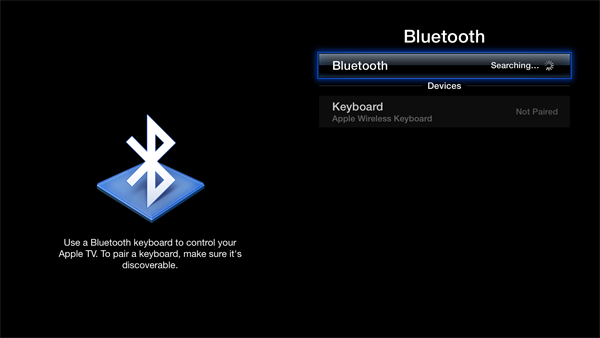
5) You will immediately see the word “Bluetooth” at the top of your screen with the word “Searching” next to it.

apple tv bluetooth keyboard How to add and use a Bluetooth keyboard with your Apple TV (5.2/iOS 6.1)

6) In a matter of seconds you should see your Bluetooth keyboard’s name pop up on your Apple TV.

7) Using the Apple TV remote, click on the name that represents your Bluetooth keyboard.

8) You are now met with a sequence of 4 numbers: type these IN ORDER on your keyboard.

bluetooth atv 02 How to add and use a Bluetooth keyboard with your Apple TV (5.2/iOS 6.1)

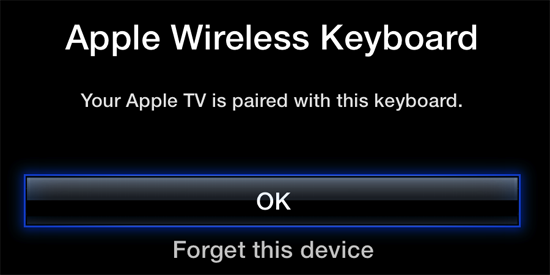
9) Congratulations, your keyboard is now paired with your Apple TV.

bluetooth atv 04 How to add and use a Bluetooth keyboard with your Apple TV (5.2/iOS 6.1)

HOW TO USE

Now that your keyboard is paired with your Apple TV, everything can be controlled by either the keyboard or your Apple TV remote. So, let’s assume that you now want to put away your remote and control your system via the keyboard – here are the basic keys that you would be looking for:

On the KEYBOARD On the REMOTE
Enter Select
Esc Back
Arrows (up, down, right left) Navigation Buttons

You can use your keyboard to:
  • Enter text and other information (search, email addresses, passwords, and so on)
  • Navigate Apple TV menus using the arrow, Return, and Escape keys
  • Navigate recently updated aTV Flash (black)
  • Jump to an item, title, or name on the screen by typing the first few letters (for example, when viewing your music collection, you can type a song title or artist name to jump to it in the list)
  • Use media controls when playing music and video to play or pause content and select previous or next.
Volume, brightness, and other controls are not available for Apple TV. Apple TV uses the U.S. English keyboard layout regardless of the keyboard’s hardware layout.

DISCONNECTING

If you want to stop using your keyboard or disconnect it from the Apple TV:
  • Select Settings -> General -> Bluetooth
  • Select your keyboard and then select “Forget this device”
bluetooth atv 05 How to add and use a Bluetooth keyboard with your Apple TV (5.2/iOS 6.1)

How fast is USB 3.0 really? and Thunderbolt | Macworld

How fast is USB 3.0 really? | Macworld

What does it all mean?

While you won’t see a tenfold increase in the transfer speed from USB 2.0 to USB 3.0 in real-world use, USB 3.0 is fast—about three times faster than USB 2.0 with a spinning hard drive, and three to five times faster with SSD. And using a hub doesn’t impact speeds, even with other (and slower) peripherals attached. USB 3.0 is also faster than FireWire 800, and it stacks up favorably against Thunderbolt. Also, depending on the task and the drives used, it can be just as fast Intel’s speedy connection. When you remove the drive-speed bottleneck (by using an SSD), however, Thunderbolt can trump USB 3.0 easily. 

6.6.13

Utility for Syncing App Data via Dropbox

Utility for Syncing App Data via Dropbox


I have a cool new utlity to release today! DropboxAppSync is a simple utility that will relocate any Application’s Support folder to your Dropbox account so that it can be shared across multiple Macs. I initially developed this so that my cusotmers could easy share their DomainBrain database and Rapidweaver Stacks across multiple machines. However, I quickly morphed the application so that it will sync the support folder from any application!!!
Download Now
NOTE: While syncing application data over Dropbox has become a pretty wide spread practice, not all applicaitons may support this behavior. Proceed with caution.

How to run DropboxAppSync

There are a lot of techie details below. As a common user, you just select your app and click OK!

On your 1st Mac

Make sure that you run this first on the Mac where you would like to use its application data first. The data from this Mac will be sync across all your other computers.
  • It will first prompt you for which application you would like to sync. Make sure that the app is not running!
  • The Application Support folder for the selected application will be located and backed up to your desktop.
  • A folder named Application Support will be created in your Dropbox folder if it does not already exist. (I stole this idea from BBEdit. Great idea guys!!!)
  • Then the support data for your application will be copied into sub-directory with the name of the application into the Application Support folder created on Dropbox.
  • Finally a symlink is created from the original Application Support folder to the one just created on Dropbox. This is the magic part that tricks your application into thinking that everything is copasetic.
  • Once you have verified that everything is working properly, you can safely remove the backup copy of your application’s data that was saved to your desktop.

On your 2nd, 3rd, 4th, Nth Mac

  • Allow Dropbox to sync the application data before you run this on subsequent machines.
  • Just as before, you will be prompted for which application you would like to sync. Make sure that the app is not running!
  • Just as before, the Application Support folder for the selected application will be located and backed up to your desktop.
  • Since you woudl have already ran this on another machine, DorpboxAppSync will see that an application support folder for the selected application already exists. Therefore, no data will be moved into Dropbox.
  • Just as before, a symlink is created from the original Application Support folder to the one found on Dropbox.
  • Once you have verified that everything is working properly, you can safely remove the backup copy of your application’s data that was saved to your desktop.
And that’s it! You can not enjoy the cross machine syncing on any of your favorite applications. Here is a small list of some of the applications that I have done this with so far. They all seem to be running pretty smoothly for me.
  • BBEdit
  • Coda
  • Courier
  • Rapidweaver
  • DomainBrain
By now, I am sure that you have a DropBox account, right? If you don’t, what are you waiting for? Go and get your 2GB of free space in the Cloud!
    • JiveDig Caroline Mathieson 2 years ago


      Should be this:
      http://www.dropbox.com/help/36
      I've run into a 'conflicted copy' when this happened with a RW sandwich file.  I opened it on one computer not realizing it was still open on another.
      Dropbox saved 2 copies of the file, one was conflicted and the other not.  The problem is the a RW sandwich file is NOT 1 file.  I had to go into every folder within the contents of my file and change the name from index(conflictedcopy).html to just index.html.  On my large site it took a while.  The reason was that the copy that because the conflicted one was actually the one I had made all the needed changes to.
      It was a scary time!

  • Avatar

    Guest 2 years ago


    Since preferences sync is pretty much moot now with iCloud, will this feature be added to your Sync program?

  • Avatar

    JiveDig 2 years ago


    W are naturally assuming the biggest issue is making sure the app is closed and Dropbox is done syncing before launching on another computer?
    Also, once this is setup I'm assing we can add/remove stacks and plugins from Rapidweaver from either machine and have it sync, right? It's not just from the first synced computer, that would negate the point. . .


    • Joe Workman Mod JiveDig 2 years ago


      Yes. You are correct on both points. Make sure the app is closed when you run this utility. And yes, if you install a stack and or plugin on one machine, it will get sync over into the other.

5.6.13

Rethink Ink: Digital Signatures Are Faster & Safer

Rethink Ink: Digital Signatures Are Faster & Safer

Pen and paper signatures? Such madness must cease!

Law Technology News
June 3, 2013
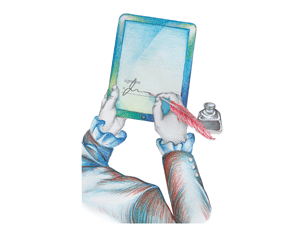
Using a pen on a tablet
Pen and paper is an inferior option for executing legally binding agreements. Yet a recent study commissioned by Adobe Systems Inc. found that 98 percent of surveyed managers "still rely on hard copy in the 'last mile' to deliver contracts to get clients and customers to sign on the dotted line." Such madness needs to cease. Electronic signatures are an idea whose time has long since come.

First, a confession of bias: I lose physical objects. At this point, family members gift me key finders for sport. They wager on how long it will take me to misplace both my keys (weekly) and the finder (immediately to three months). Paper, in particular, seems to vanish into thin air despite the fact that I use so little of it — the 20 pages currently in my office are conspicuous and easy enough to sift through.

Serial mislaying of physical objects is an unfortunate trait for a lawyer. I find solace in having company. Porous paper trails plague even the largest, most sophisticated organizations. Consider some recent legal events:

• Missing and unauthenticated documents were at the heart of mortgage lenders' $25 billion settlement with the Department of Justice.


..... read more here


4.6.13

Google Reader is shutting down, whats next for Caffeinated? | GeekyGoodness

Google Reader is shutting down, whats next for Caffeinated? | GeekyGoodness


Google have announced they are shutting down the Google Reader service on July 1st this year ( 2013 ), so what is going to happen to Caffeinated?

Between now and July 1st Caffeinated will become independent of the Google Reader service and moved over to be a completely independent feed reader, free from any third party API.

You get the same great user interface and reading experience you have always known, just without the limitation of a third party API.

This is my current plan forward, watch this space for further developments.

3.6.13

Remove Blogger Sidebar and Maximize Main Width on Selected Pages | Southern Speakers v3.0

Remove Blogger Sidebar and Maximize Main Width on Selected Pages | Southern Speakers v3.0
Sunday, May 1, 2011


This one is a famous request in Blogger Help Forum - how to hide the sidebar on one of the static pages, and make the main blog show in full width in that page, and in that page alone. Usually, I'd give a personalize solution for each asker, as each one of them had different blog with different template that had different settings.

Today, I finally took the time to generalize this tweak. Anyone can use the solution in this page, and you'll get what you want - refer to the title, I'm not gonna repeat what this tutorial does. Or maybe I will. You get to hide your sidebars (doesn't matter left, right or both) and use that space to widen your main posting area, on pages that you choose. You can apply this tweak both on your static pages and/or your post pages (the page that loads when you click on the title of your posts).


Click here for a live demo.

Did I mention that this is a one-step tutorial?
Step 1: 

If you're using the old Blogger interface: Go to Dashboard - Design - Edit HTML - Back Up (Download Full Template) -

If you're using the new Blogger interface: Go to Dashboard - Template - Backup/Restore - Download Full Template - Close -  Edit HTML - Proceed -

Find for </b:skin> - Paste the following directly below </b:skin> - Change the address in Line 1 to the address of your page.


<b:if cond='data:blog.url == "http://yoboy-testblog7.blogspot.com/p/bla-bla.html"'>
<style>
.main-inner .columns {
padding-left: 0px !important;
padding-right: 0px !important;
}
.main-inner .fauxcolumn-center-outer {
left: 0px !important;
right: 0px !important;
}
.main-inner .fauxcolumn-left-outer, .main-inner .fauxcolumn-right-outer, .main-inner .column-left-outer, .main-inner .column-right-outer {
display: none !important;
}
</style>
</b:if>