Did you know that Blogger allows you to have your blog hosted on your own custom domain? Well, it's true.
You can have your blog up in minutes without the headache of paying for web hosting. You basically continue to blog on Blogger, using the same login and having the same back-end interface (dashboard) but you get to have your own dot com domain.
This allows you to build your online brand and it also makes your readers remember your web address easier. Don't forget to keep your blogging useful and entertaining!
Move your blogspot blog to your own subdomain
In order to do that, you must follow the fist three steps described in a previous post: How To Make a Subdomain in GoDaddy.
1. Once you are on Domain Details page, look for DNS Manager and click the Launch link.
2. You'll land on Zone File Editor where you have to click on Add New Record.
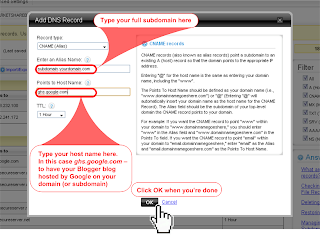
3. A popup window will appear - select CNAME (Alias) from the list of options.
4. If you want to host your blog on a subdomain you previously created then type your full subdomain in the first field and then type ghs.google.com in the Host Name field. Click OK and you're done!
Move your blog to your domain (not subdomain)
If you didn't create a subdomain for your blog and you want to host it on your main domain, then follow the steps below.
- In the CNAMES section (File Zone Editor - step 2 above), click the Edit symbol (pencil) for the "www" record.
- In the Points To host name field, type ghs.google.com.
- Click Save File Zone button.
- Log in to your Blogger account.
- Go to the Settings tab.
- Click Publishing.
- Click the Custom Domain hyperlink.
- In the Buy a domain for your blog section, click the Switch to advanced settings hyperlink.
- In the Your Domain field, enter your domain name. For example, enter www.coolexample.com.
- To specify another location in which to look for files, in the Use a missing files host? section, select Yes and enter the path. If not, specify No. (Most of the time you may wanna specify No.)
- In the Word Verification field, enter the characters as they display in the image above the field.
- Click Save Settings.
You can now blog your way to success on your own domain! Cheers!


